Showing posts with label craft. Show all posts

Tuesday, November 4, 2014

The Invitation

In our family, Birthday Parties went away at about age 8. Instead we have spent the past few years going out to nice dinners and shows or activities. This year is different. This year kiddo will be a (GASP!!!!!!) teenager. Yup, lucky number 13 has arrived my friends. And in honor of this (still gasping!) milestone year, we agreed to a party. Heck, we even said she could invite as many people as she wanted. She came up with a whopping 8. (whew!!)

Step one to any good party - the invitation. Our theme is the Mad Hatter's tea party - but more Johnny Depp and less Disney. I wanted to come up with a fabulous invite, and I think I did pretty well.....
These have screw on bottoms

She liked the vintage feel of these.
First we got these at our local Hobby Lobby. She liked that they were all different (mom liked that they weren't expensive). 
The Burlap has a paper backing

Jewelry Boxes were the perfect size. 
After cutting the burlap in to strips that were small enough to fit in the boxes, I wrote out the invite information on the paper backing. 
I tried to keep the language in theme. 
Rolling up the burlap was pretty easy and it gave me enough space to write all the information and still fit in the box. 

The "high tech" tool (rubber band) kept it rolled while I tied my fabulous little twine around it to keep it from unraveling in the box. Now it's time for assembly. Remember those cute little trinkets from the first photo? Well.......

Turns out, they look just like little door knobs. Don't forget those keys either.....

Ready to Deliver!
This key was one of the bigger ones. I like the smaller ones better, but all in all I think these were some great little invites. She was most pleased that they didn't look like the whimsy ones that she saw on the net while browsing. She wanted something more Victorian. I also think these would be great, maybe without the key, for a Monsters Inc party. 
Ready to Deliver!
As a side note, the two that I did have to mail, I used a padded envelope just in case. It cost me $1.10 to mail each of them.


Wednesday, October 22, 2014

Challenge Accepted

A couple of days ago I was lost in blog fabulous-ness following links from one to the next to the next. I discovered some very crafty ladies. Among them was a challenge to create a card using Purple, Orange, Lime, Black, and any sort of Die-Cut. I do love my Cricut machine....I know a lot of my crafty friends have moved on. I just can't let go. Anyway, I cut out a few different things, played with some ideas, used only scrap paper in the assigned colors and here we are.......

The words are a layered Die-Cut from my Cricut machine, and the squares were also cut with the machine, but happened to be left over from a previous project. Although it look more yellow in the photo, the paper behind the yarn is actually lime. Now I just need someone to mail this to......

Any takers?

Thursday, October 16, 2014

Fun with Letters

Although I am not quite up to an entire 31 day challenge, Randi has certainly inspired me to get some of my wood project done.

Sale Letters!

I got these on sale at Hobby Lobby a while back, and although I knew pretty much what I was going to do with them they have been sitting longer than I will admit. 

Shiny!
I didn't need all of the smaller letters, so I will need to think of something to do with those later. 
All Done!
The base coat of black is actually chalkboard paint (my new obsession) so I can draw on the "G". I put a nail above my door bell, and right now it says "Trick or Treat" and is hung up with a Happy Halloween ribbon that I just wrapped around the top and tied in an bow. I am super happy with how it turned out, and it really only took me a few minutes outside of drying time.

Thursday, June 26, 2014

Stampy Storage Solutions

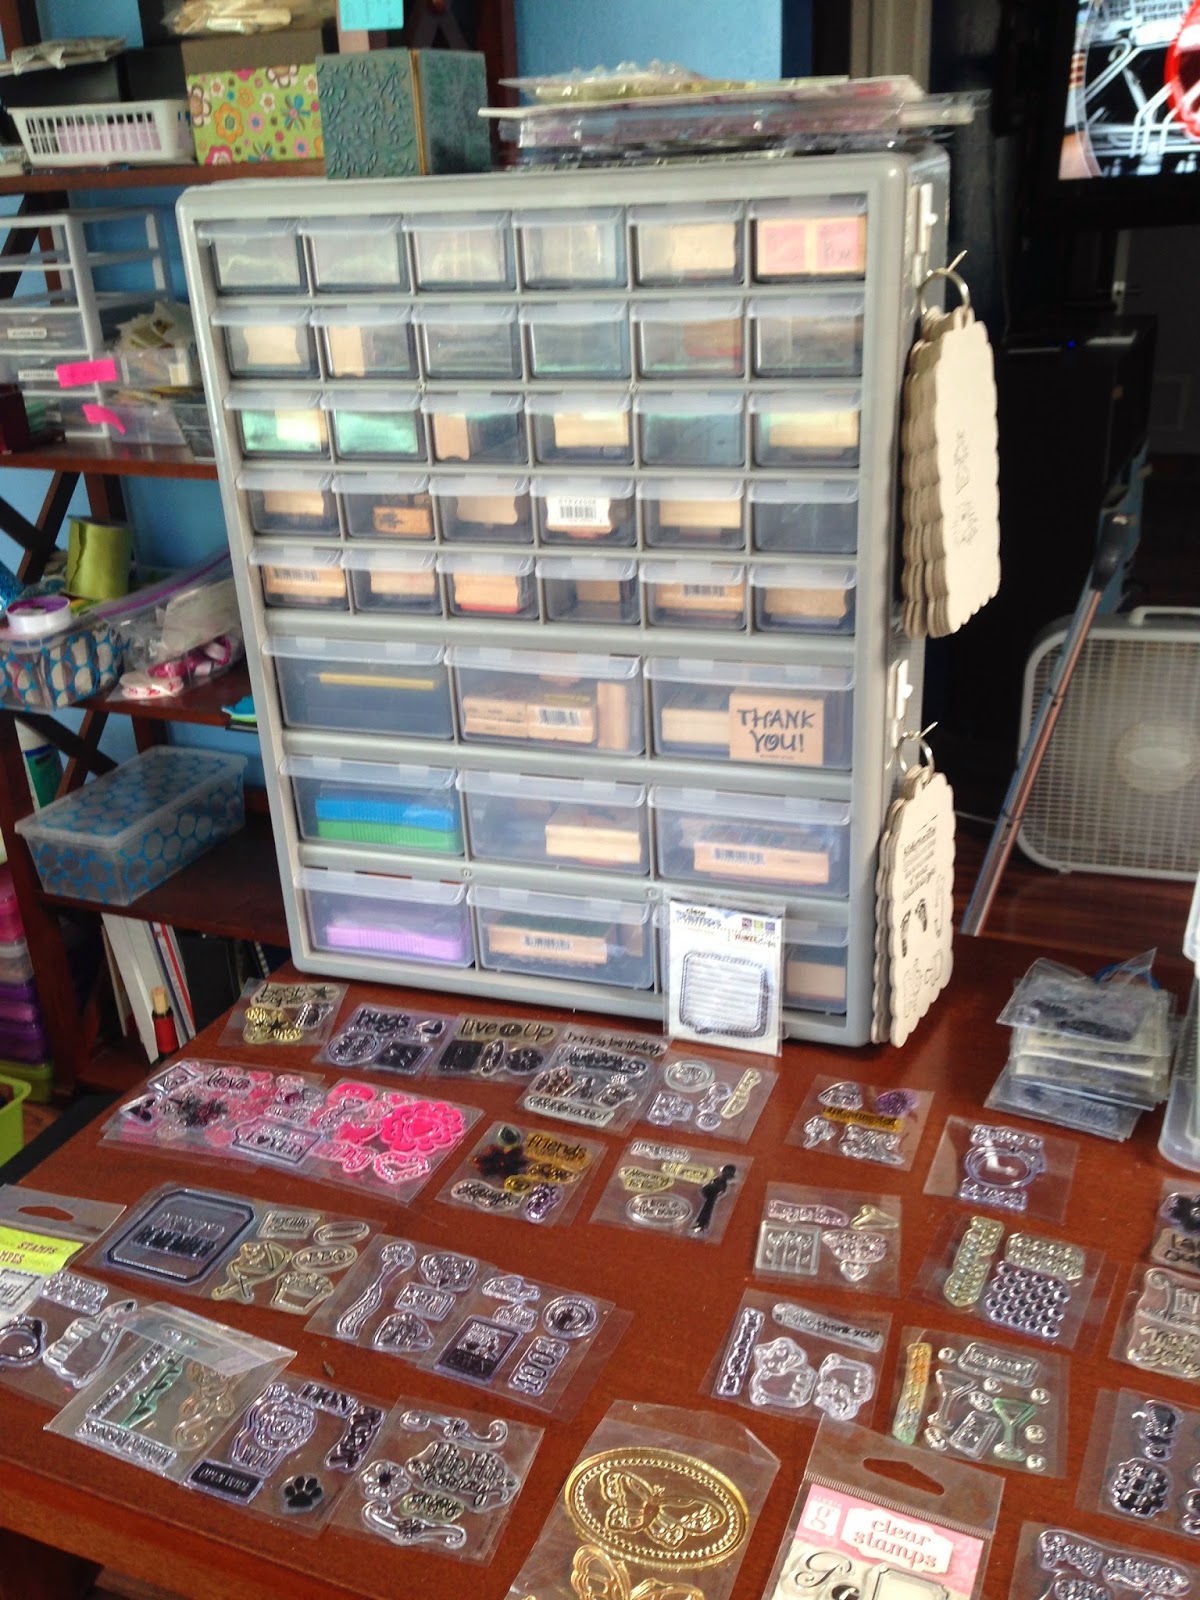
I have struggled for years to find the best way to store my stamp collection. Yes, I am old school like that and still have wooden block rubber stamps.
My collection
I could never decide or find the right bin or box to keep them in - until now!! I honestly can't remember where I saw this idea (Becky perhaps?) or in what application it was used but this little thing is my new BFF!
From Home Depot
I put some thought in to the fact that I didn't want a repeat of a previous problem - that if I can't see them I don't know what I have. So first I grouped similar stamps together to see what I was working with. Then I started dividing them in to drawers to make sure I maximized space and made sure the bigger stamps had a home. Then I did something that took forever.....ok, like 3 days but still....
Prints
I once bought out an entire Michael's bin of these chipboard albums. At ten cents each you would have done it too and you know it, so don't judge. Because I have so many of them, they were perfect. So I stamped. 
And I stamped.......
It took me several of these little albums to stamp them all but I finally got there. The images on a single page correspond to a single drawer in the little "dresser". And the cute tape? Identifies which drawer to go to!
Almost there..
So now I have these handy little flip books of images to peruse when I am looking for a stamp. And since they are grouped, deciding which "Happy Birthday" one to use is a snap! Then to make sure that the books were kept within quick reach I grabbed some Command Hooks. 

Ummm.....yes that would be the dresser full and my clear stamps waiting their turn to make reference books. You know what that means! Back to Home Depot (thanks Adam!) 
Fabulous!! I even had some of the smaller drawers still empty at the top so I added a few stickers to the front. 
Star Brads
The stickers help me remember which type of fun tidbit I have tucked in there. And finally, Adam the Amazing hung my organizers on the wall next to my book shelf. 
All Hung
Now I can find my stamps and inks quick! I love this new wall system! The rest of my craft room is under reorganization too, so who knows what else I might come up with! How do you organize your crafty corner?


Wednesday, May 7, 2014

4 in 14 May

As the month was turning yet again, I was trying to think of a cute theme for my May "pretty shelf". May brings to mind Mother's Day, but somehow decorating a shelf saying I was great seemed a little too far. (Although perhaps the kiddo gets a guest starring role next year!) So, I went a little on the lame side with the whole "April Showers, May Flowers" route and tried to find things I already had that reminded me of Spring and flowers.
May Flowers
Here is the shelf as a whole. If you have seen my other months, the bird and rabbit are March recycles, and the vase is a February recycle. This was a bit of a harder month for me, since I was really trying not to spend money on anything new.
February Recycle
 Next to the vase, I added this colorful little bucket that I picked up in the Target Special Finds bin for a dollar around Easter time either last year or the year before. They have them all the time in different designs at different holidays / seasons.
Kid Creations
If you have ever celebrated even one holiday with a kid in Pre-School or Elementary school, you know what these are. Yes, mine are now about 8 years old. No, I have never lit the candle inside. Yes, they did melt in the moving boxes at one point. Don't care. Still keeping them. In fact, hoping to get more when I get grand-babies ( a LONG time from now).
Silliness
The last little fun flower I added was this chipboard album I made a couple years ago. Since it is sturdy and on a ring, it stands up like an easel all on it's own. This is one of my favorite pictures of her - we are at the World's Largest Gift Shop in Las Vegas and the giant hat is made of foam, the poker chips are pillows. We were there waiting on family to gift shop, so we decided to get silly with some of the SWAG.

Friday, April 25, 2014

4 in 14 April - Project

Back around Christmas time I saw this fun idea on Pinterest to leave little gifts on your neighbors doors. For some reason I decided it would be fun to do it again for Easter. I thought it would be fun to leave little egg on the doorsteps for our neighbors with treats inside.
Printed "tags"
I started by printing a few sheets of these little "labels" on some pastel computer paper. 

All Trimmed

Thank you straight trimmer for making cutting these little guys a breeze. So far I think this project is about five minutes in and I am almost done. Loving that. Now for the treats....
Yum!!
I bought the assorted bag of non-melting candy. We already have temperatures in excess of ninety so chocolate was out of the question. We sorted it out so that no one person would get all the same thing. 
Pink!
Each of these little eggs held five little candy treats in them. The left over was my daughter's favorite part, as she is a fan of the Bottlecap candies. The last piece of the puzzle was to put the little strips in the eggs. 
Egged!
We folded it a little bit so that the "From the" part was tucked inside and all that showed was the "You have been egged" part. Our original plan was to leave them for people to wake up to Good Friday morning, but life got away from us. So instead the next morning they were found. My husband and daughter really enjoy their "ninja" skills slinking through the neighborhood delivery these.


Sunday, January 26, 2014

4 in 14 January - Project

Recently we have been painting our entire house. If you know me at all you would be aware that having a room one solid color is simply unacceptable. There are at least 5 colors in the living room alone. As you can imagine, this leads to a lot of paint cans in the garage. Because I use different shades on opposite walls, it can sometimes be confusing to keep track.
On a separate note, I was cleaning out my craft area and found chipboard books that I picked up at Michael's on clearance.
Twenty Five Cents
That gave me the idea to make a portable little sample book. I kept it pretty basic. On each page of the little flip book I put the sample from the paint store. 


I wrote the location in the house where each paint was used. I like that this can easily fit in my purse to go to any home decor store I might be visiting and want to coordinate things with. Just to be sure I have the correct matching colors I added the paint labels to the back of each page. 
When buying paint, simply ask the employee to print you an extra sticker. This is especially helpful if you are having them make you a paint that is a custom color match to an item you brought in. 

Thursday, December 26, 2013

Employee Gifts

Every year I make a little something to give to my husband's employees as a "Thank You" at Christmas time for all their hard work. I try to change it up and make something different each year.
Spices
This year I decided to do little spice jars. Here is a collection of the spices I collected. I worked from a recipe that my mom gave me a couple of years ago. We refer to it as "Bam Bam" as it is an all purpose spice recipe from Emeril Lagasse that she found online somewhere. My copy of the recipe is on a little scrap of paper in faded pencil from my mom. It took me three batches of the recipe to fill 18 jars.

Here they are all lined up on the counter. They are actually from the wedding favor department at Michael's and were on sale. They worked out to be $0.70 per jar before filling. 
Not sure why this rotated?
Here are all the jars with their tags on them. I cut out the tags on my Cricut machine and then embossed them with red embossing powder and my heat gun to make them nice and sparkly. On the back of the tags I added a printed note saying that it was Bam-Bam and an all purpose seasoning. Everyone loved them. I didn't think to calculate the total cost once the spices were mixed, but I do have quite a bit of left over spices. 


Sunday, December 1, 2013

Christmas Blocks

I saw these for sale online, but I didn't want to pay the prices the website wanted. So, I thought...I can do that. I do love the lumber department at my local Home Depot.
Cut & Painted
I went with the traditional red and green, adding a generic white, from my paint collection. Then came the fun part. Once again, using my overly out of control scrapbook paper collection I pulled out some fun prints. Deciding on which words to use was a joint effort - I got the kiddo to help. We used my Cricut machine to cut out all the letters. 

To adhere the letters we used our trusty Modge Podge. I do love that stuff and it is so easy to use. The best part is that it only takes a few minutes to use and apply. Once that step was done, I used an outdoor spray sealant over the whole thing to make sure it was relatively weather proof. I live in the desert, so no snow....but we do get the occasional rain. 
All done. 

Wednesday, October 23, 2013

Froggy Fun - Snacks

Still continuing the frog theme for the party, I decided to make a couple fun snacks. These were really more about table decoration than actually thinking they would get eaten. They were fun to make. We happen to have one of those "every old fashioned candy you forget ever existed" stores near our house, so that made things easier.
I should mention that other than the actual snacks, and one $1 spool of ribbon from Michael's craft store, this project was made out of stuff I already had here.
First was this easy tag:

Why is my photo rotating??? Grrr....
 Which I put on to this jar and filled it with green grapes. Healthy snacks are important at a party too! Now lets get on to the tasty treats!!


The frog eyes were little green and white sour gummy circles and the pucker up label was on these cute little "kissing frog" gummies - both of which I put in some extra canning jars I had on hand. I will say that being able to screw the lid on and take it with me to the party was super handy!

Froggy Fun - Banner

Throwing a surprise party is fun. A friend is a huge fan of frogs. Her BF, and the official party planner told me to take the theme and run with it. So I did.

First I cut out some "tags" using my Cricut.
Again, referencing my out of control paper collection, I added green patterned paper mats to each tag.

This part was pretty easy, using scraps from my collection. I made sure that one side of the mats was a perfect 3" to give me even cuts across a 12" paper, which a lot of mine are. I thought about rounding the corners but that seemed like unnecessary extra work.
Next came the letters. Since it was a frog theme, I went with "Hoppy Birthday". I used more scrap and just played mix and match. I also went through all of the fonts on my Cricut and played mix and match with those too.
On either end of "Hoppy" and her name I added this cute little guy.....taken from a Google search for "frog clipart".
 
I originally knotted the ribbon on the tags, but then they didn't lay right when I was hanging it. So I decided on this little double loop pattern.
It worked out much better. I alternated feeding the first loop from the front, then from the back. The banner laid perfectly after that. I left it in three separate strips since I wasn't sure how big a space I had to hang it at the party location.
And of course I forgot to take a nice photo of it after I hung it up.